Server & UI
Zene are separated into two components:
Server
Zene Server serves as the underlying infrastructure for Zene, facilitating the execution of the tool flow. Importantly, Zene UI is not a prerequisite for utilising Zene Server. Instead, Zene Server can be accessed and remotely controlled via the Zene UI software. This separation of components allows users to interact with and manage Zene Server without requiring direct access to the server's hardware.
How to start the Server
For Windows
- Go to
Start Menu - Search for
Zene - Click on
Zeneto start the server
Or
(If the user has selected to create a desktop shortcut during installation)
- Go to the
Desktop - Double-click on the
Zeneshortcut to start the server
For Linux (Ubuntu 22.04)
- Open application menu
- Search for
Zene - Click on
Zeneto start the server
UI (User Interface)
Zene UI is a web interface that allows users to remotely access and control the Zene Server. Zene Server must be running in order for Zene UI to connect to it.
How to access the UI
On the same machine as Zene Server
The UI will automatically open in the default browser when the server is started. But if the user has closed the UI, they can open it again by:
- Using the shortcut on the application tray:
-
For Windows
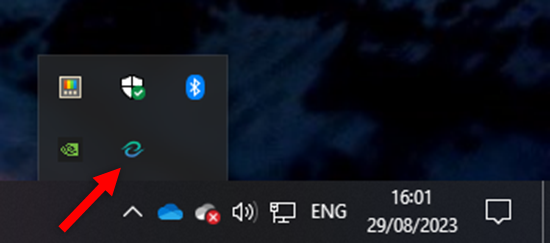
- Right click on the Zene icon in the application tray
- Click on
Open Web UI
-
For Linux (Ubuntu 22.04)
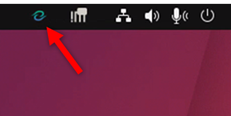
- Right click on the Zene icon in the application tray
- Click on
Open Web UI
-
OR
- Opening the following URL in their browser:
http://localhost:19011/
The default port for Zene UI is 19011. If the user has changed the HTTP port, they will need to use the new port number instead.
On a different machine/ remotely
To access the Zene Server remotely from a different machine, the user must note the IP address of the machine running the Zene Server. The user can then access the Zene UI by opening the following URL in their browser:
http://<IP address>:19011/
For example if your Zene Server's IP address is 123.456.789.0, then the URL will be:
http://123.456.789.0:19011/
The default port for Zene UI is 19011. If the user has changed the HTTP port, they will need to use the new port number instead.
By default, the Zene Server can only be accessed within the local network. However, if the user wish to access the Zene remotely over the internet, they need to configure their network to allow remote access.
This configuration involves setting up port forwarding or creating a virtual private network (VPN) connection to establish a secure connection between the user's device and the Zene Server. The specific steps for network configuration may vary depending on the router or network setup being used.
Once the network has been properly configured, users can launch the Zene UI software on their remote device and connect to the Zene Server by specifying the server's IP address or domain name. This allows users to remotely access and control the Zene Server's features and functionalities from outside the local network, provided they have the necessary permissions and credentials.
See Login Area for more information on how to connect to Zene Server.
For the best performance, it is recommended to use a wired connection between the Zene UI and Zene Server.
User might encounter latency and performance issues when connecting to Zene Server remotely via the internet. This is due to the network speed and the distance between the Zene UI and Zene Server.
When connecting to Zene Server remotely via the internet, it is highly recommended to use a VPN connection to ensure the security of the connection.
Communication
When the Zene UI is connected to the Zene Server, the Zene UI will establish a subscription to the Zene Server. This subscription allows the Zene UI to receive updates or changes made to the Zene Server.
Any modifications or updates made to the Zene Server will be automatically sent to the Zene UI. This ensures that the Zene UI remains up to date with the latest information from the server.
Conversely, the Zene UI is also capable of sending any changes made within its interface back to the Zene Server. These changes can include user actions, input, or any other relevant updates.
In cases where multiple Zene UIs are connected to the Zene Server, they will be synchronised with each other. This means that if one Zene UI receives an update from the server, the other connected UIs will also receive the same update, ensuring consistent and coordinated information across all connected interfaces.
The number of Zene UIs that can be connected to the Zene Server is limited by the Zene Server's license tier.